How to Create a QR Code Menu for Your Restaurant
Create a QR code menu with dishes, prices and photos. Build a hosted restaurant menu, publish it, test your table signs and update it without reprinting.
To create a QR code menu, publish your menu online, generate a QR code for its link, and test the printed code with a phone. With Scanely Pages, you can build and host the menu in the same place: choose a restaurant template, add your dishes and prices, then publish to get the link and QR.
This guide shows that workflow for a small restaurant or café. You will finish with an editable menu that guests can open in their browser, without needing a separate website.
Choose an editable menu or a PDF link
Start with what you want to update during service. The QR code opens the destination you choose; it does not turn a picture of a menu into editable dishes.
| Your starting point | A suitable approach | How you update it |
|---|---|---|
| Dishes, prices and photos you want to edit individually | Build a hosted menu with Scanely Pages | Edit the page and save, keeping the same link and QR |
| A PDF menu already hosted online | Use the PDF QR code generator with its public link | Replace the PDF at the same URL, or use a dynamic URL code if the destination needs to change |
| An existing menu on your restaurant website | Create a URL QR code pointing to that page | Update your website; a dynamic code also lets you change its destination |
An editable menu is useful when a dish sells out, a price changes or you add a seasonal section. A PDF link can work well when your existing document is easy to read on a phone and you already have somewhere to host it.
The steps below use a hosted Scanely Page.
1. Pick a restaurant menu template
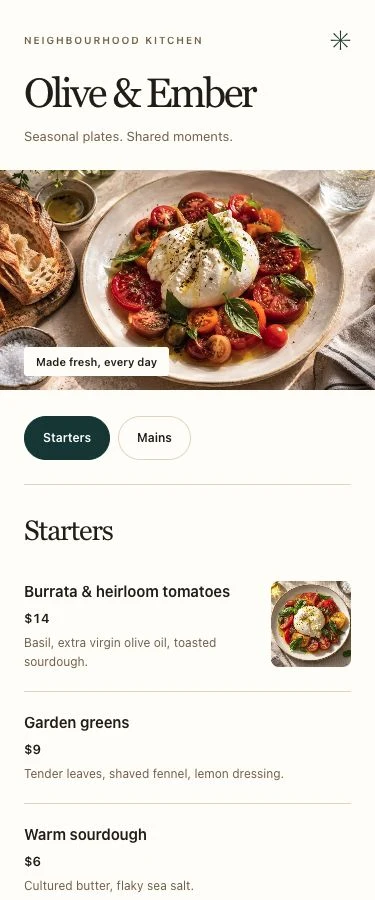
Open Pages in your dashboard, choose New page, and browse Restaurant menu. There are three starting designs:
- Neighbourhood bistro: a photographic menu for seasonal dishes.
- Supper club: a restrained layout for a dinner menu.
- Morning café: a bright starting point for breakfast, coffee and pastries.
Preview the options, then select Use template. This creates an unpublished draft. Give it a name you will recognize, such as “Main restaurant menu”.
All three templates are available on Free. A draft uses one of your account’s shared Pages and QR code slots; browsing the templates does not.
2. Add your dishes, prices and contact details
Work through the page in the order a guest will read it.
First, change the header to your restaurant name and a short introduction. Replace any sample business details, photos and links before publishing.
In the Menu block, edit the section names and items. For each dish, add a clear name, description and price. Include the currency in your price text so that a visitor can understand it without guessing.
For a small café, you might use “Breakfast”, “Something sweet” and “Coffee & tea”. Keep descriptions focused on what helps someone choose. Check every price against the menu your staff are using.
Add an address, opening hours, phone number and website in Contact where useful. If the menu includes a button for bookings or online ordering, set it to the service you actually use. A menu page displays your content and links; it does not take orders or payments itself.
Use Save draft to keep your work. Changes are not saved automatically.
3. Add photos and adjust the design
Choose a theme, then adjust the layout, typography, spacing, photo shape and button style in the editor. Use the preview to check whether the dish names and prices are easy to read.
Free supports two photos per page and three themes. Those photo slots include sample photos, header photos and menu-item photos, so replace an existing image when you want to change it. Paid plans support up to eight photos per page, all eight themes and custom colors. The Pages guide lists the current limits.
You do not need a photograph of every dish. A useful starting point is one welcoming image and a readable menu with short descriptions. Use photos that represent what you serve.
Check both the mobile and desktop previews. On a phone, look for long item names, unclear prices and important details that are buried below a large image. Reorder blocks if guests need the menu before your introduction or contact details.
4. Publish and get the menu QR code
When the content is ready, choose Publish page. Scanely saves the page and gives it a stable link and QR code.
Use Open page to inspect the public version. Then choose:
- Copy link to share the menu in a message or on a social profile.
- Download QR to save a PNG for your table sign or printed menu.
- QR design, analytics & leads for more QR design options, SVG downloads and print kits.
Changing the page’s theme changes the menu visitors see. Changing the QR design changes the printed pattern. Check each separately before sending artwork to your printer.
5. Test a table sign before printing a batch
Place the QR beside a clear instruction such as “Scan to view our menu”. Leave the empty margin around the code intact, use strong contrast, and avoid placing the pattern over a busy photograph.
Print one sample at the size and on the material you intend to use. Then:
- Scan it from a seated guest’s position with a phone camera.
- Open the menu over mobile data as well as your restaurant Wi-Fi.
- Check the public page, prices, contact details and any booking or ordering links.
- Try the sign under the lighting where it will be placed, including glare from a window or table lamp.
- Have another person use the sign without instructions from you.
The QR print guide covers size and export choices, and the print templates provide starting layouts. Keep a printed menu or staff-assisted option available for guests who prefer it.
6. Update the menu without reprinting
Open the menu in Pages, change the relevant dish or price, and choose Update live page. The saved content changes while the page link and printed QR stay the same.
Use the Sold out setting when an item is temporarily unavailable, then clear it when the dish returns. Check the public page after saving. Some pages can remain cached for up to a minute, so reload after a short wait if the previous version is still visible.
Saving a live page updates its published content. If you need to make a larger revision offline, choose Pause page before editing, save while it is paused, then select Make live. During the pause, guests cannot open the menu, so plan it outside service or provide another way to view it.
Understand what the scan numbers tell you
Your QR detail screen shows recorded visits to the menu link. These help you see when the menu is being opened; they are not a count of orders or identifiable diners. Direct clicks on the same link can also record visits.
One shared menu QR is enough when you want everyone to see the same page. If you need to compare individual table placements, read the restaurant QR placement guide and the restaurant use case before setting up additional codes. Each additional dynamic code uses a shared account slot.
QR code menu FAQ
Can I create a QR code menu for free?
Yes. Scanely Free includes the three menu templates, three shared Pages and QR code slots, two photos per page and a Scanely footer. Drafts count toward the shared allowance. See the Pages guide for current plan limits.
Do I need a website for my restaurant menu?
No. Scanely hosts a Page for you and provides its link and QR code. Guests open it in their browser with an internet connection.
Can I change prices after printing the QR code?
Yes. Edit the menu and select Update live page. Its link and QR stay the same. Saving changes updates the live menu, and some cached pages may take up to a minute to show the update.
Can customers order and pay through the menu?
The Page displays dishes, prices and links. Orders and payments are handled separately. You can add a button linking to your existing ordering service.
What is the difference between a menu page and a PDF menu QR?
A menu Page lets you edit dishes, prices and photos as individual content. A PDF menu QR opens a document at a hosted URL. Choose the format that fits how you maintain your menu and how guests will read it on a phone.
Create your restaurant menu
Start with a restaurant menu template, or explore Scanely Pages first. Keep the Pages guide open for the editor controls and publishing steps.